
Overview
You can build a form on your website and configure it so that messages arrive directly into Front. You can completely customize the look of your form using CSS.
If you've created a form, Front can give you a sample HTML source code. You'll then copy it and reuse it on your website. You can change the markup to suit your needs, but you should not modify the form attributes (action URL, enctype) or the name of the fields.
Instructions
Step 1
Click the gear icon on the top right of Front and select company, workspace, or personal settings in the left sidebar, depending on the space you’re working with.
Step 2
Click on Inboxes on the left menu and create a new shared inbox or individual inbox.
Step 3
Click Channels on the left menu, and click the Connect a channel button.
Step 4
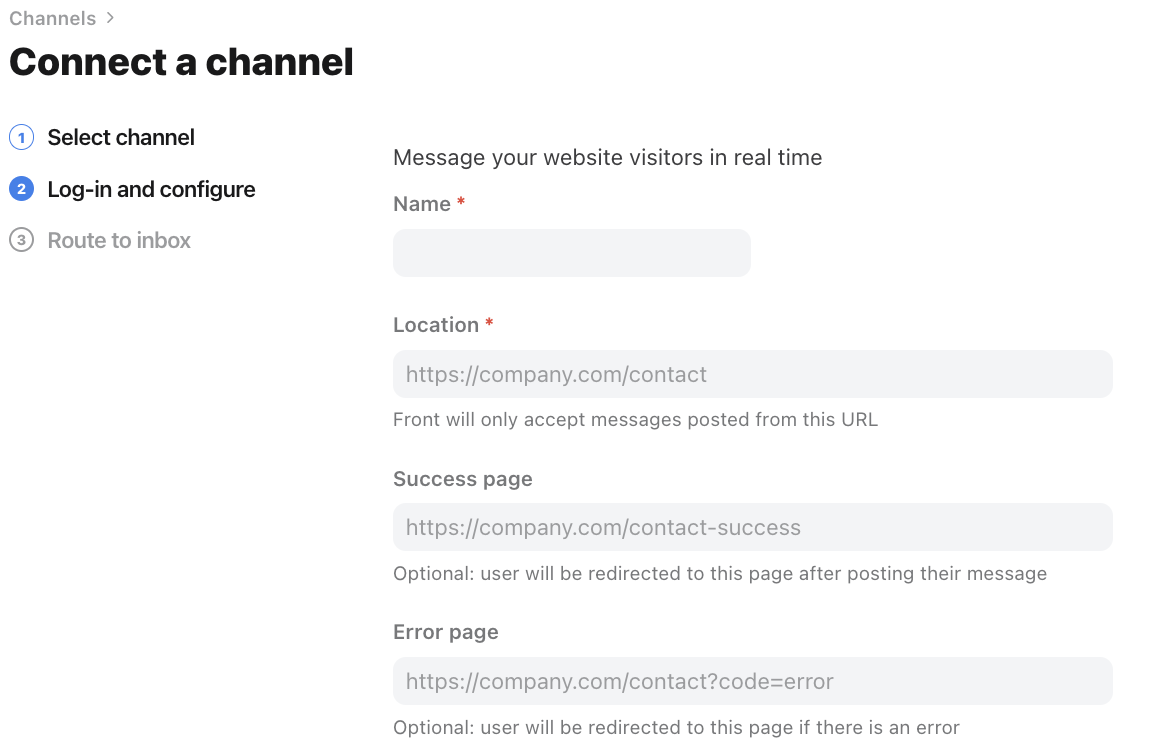
Choose Form from the channel menu.
Step 5
Complete the setup for your inbox. For Location, set the form location as the URL where your form will be hosted. As a security precaution, Front will only accept messages posted from this URL. This can be changed later if needed.
Optionally, you can also configure where the user will be sent after completing the form by entering a Success Page and an Error Page, If you leave these fields blank, a query parameter will be passed to the Location page (see below for more information).
Click Continue.
Step 6
Choose the inbox that conversations will route to and click Save changes.
Form customization
Success and error
After completing the form, Front will redirect the user to a new page. If you did not provide a success page, the user will be sent to the same page with a success code such as:
https://company.com/my-form?code=okIf there is an error, the code will be:
inactive_form: the form has been deleted.
bad_referer: the message was posted from an incorrect location.
no_email: no valid "email" field was found.
no_body: the body is empty or no body field was found.
service_unavailable: the form service is currently unavailable and cannot receive messages.
A message parameter will also be passed with a friendly error message in English.
Note: you can change the success and error pages (as well as the location URL) at any time by going to Settings > Inboxes > select your form inbox > scroll down to Form configuration.
Attachments & Extra Fields
You can add multiple attachments to your form, which will appear in Front alongside the message. If you add additional fields (in addition to name, email, and body), Front will list them in the message as well.
Subject field
If your form contains a subject field, it will be used to define the subject of the message in Front. Otherwise, you can define a default subject in the settings. The subject will be used if you reply from Front.
Spam protection: reCAPTCHA integration
If you receive a high volume of spam messages on your form, you can enable reCAPTCHA. Front supports up to reCAPTCHA v2.
Step 1
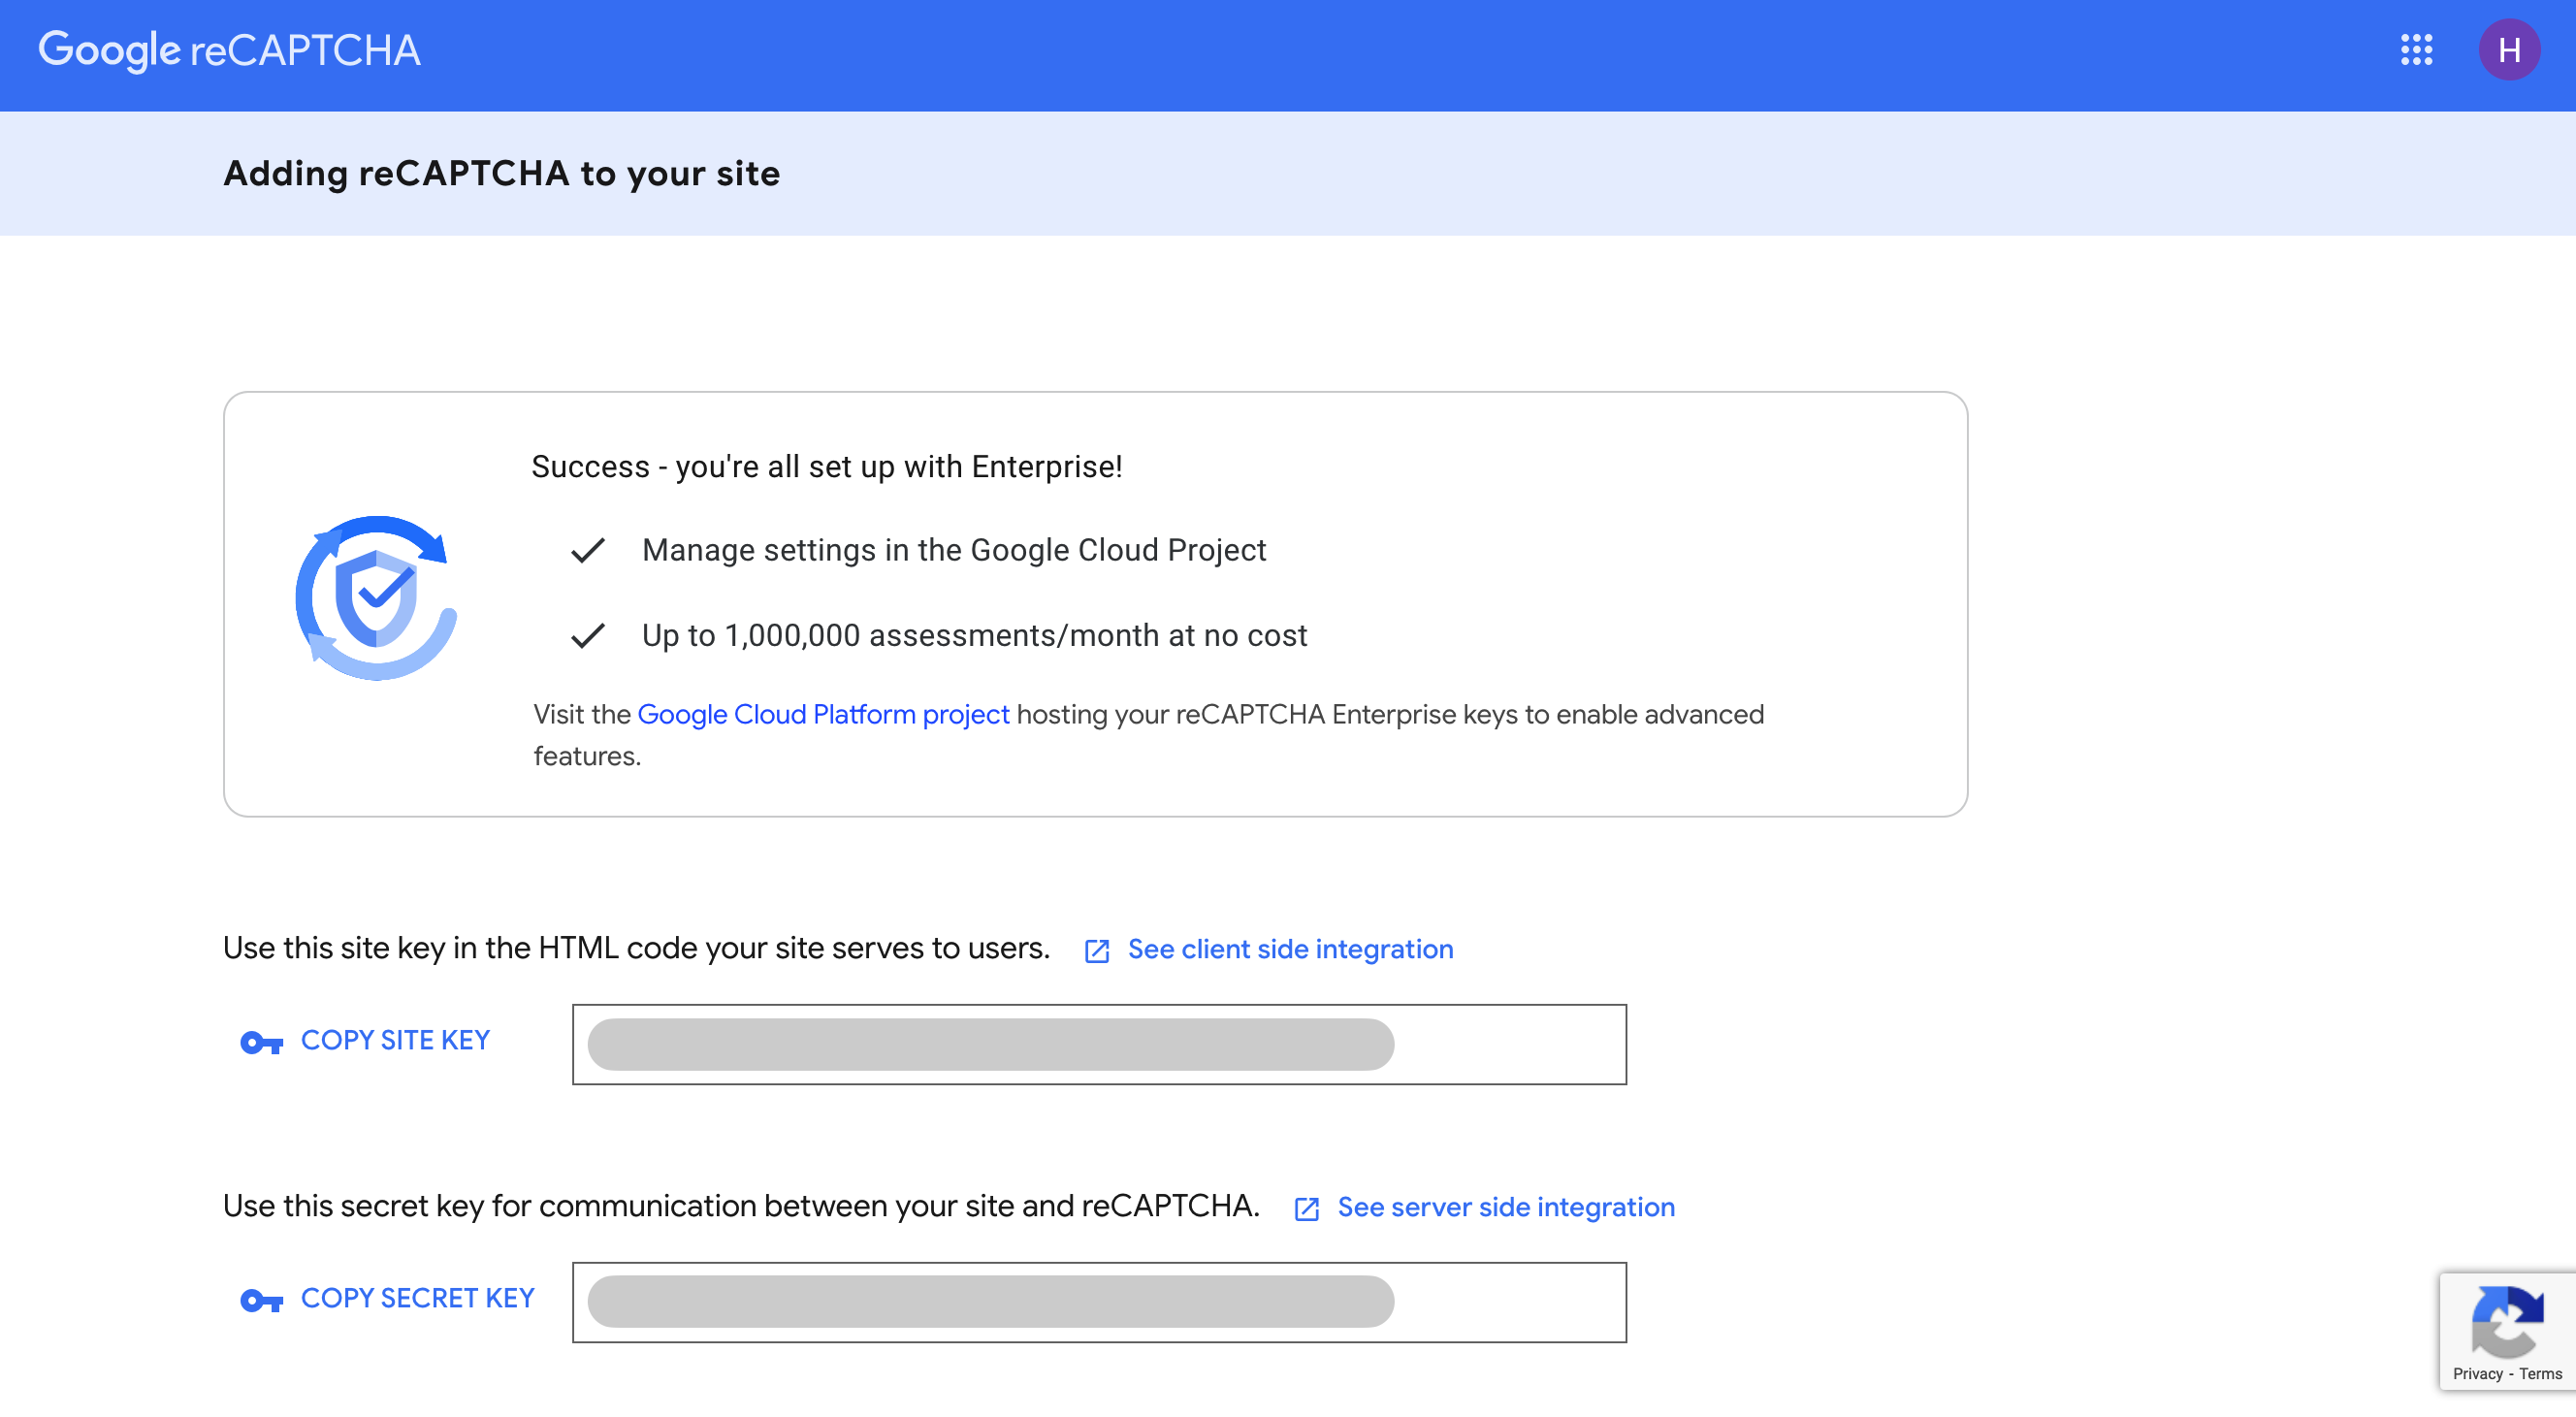
Navigate to the Google reCATPCHA registration page.
Step 2
Enter the domain where your form is hosted and the remaining fields on the page. For reCAPTCHA type field, select Challenge (v2). Click Submit.
Step 3
Copy the site key and secret key values.
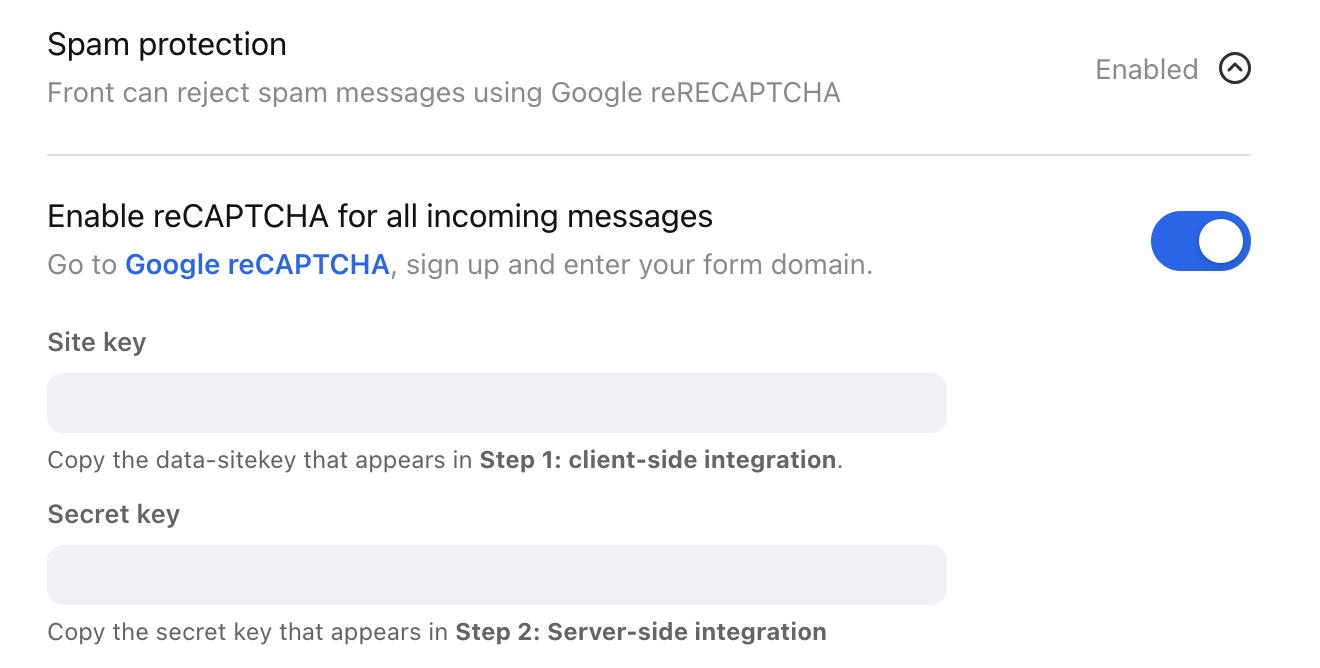
Step 4
In Front, navigate to your channel settings and expand the Spam protection setting. Toggle on Enable reCAPTCHA for all incoming messages and enter the site key and secret key values copied from Step 3.
Step 5
Adjust the code of your form to include the captcha control. The HTML will update to include the reCAPTCHA controls.
Autoreply support
You can configure Front to send an automated response to your users. Just create a rule with the following definition:
When: inbound messages
If: channel is my form
Then: Reply with my response once
By default, Front will use the first available email channel to respond. You can specify the channel that is used by adding the following field in your form (inside the <form> tag):
<input type="hidden" name="autoreply-from" value="address@company.com"> <input type="hidden" name="autoreply-sender-name" value="Company Name">The value should be the public address of a shared email channel. You can also specify a sender name that will be used to reply.
Note: Front supports recaptcha v2 (recaptcha v3 is not supported at this time)
FAQ
Can I use the same form channel across multiple pages on my site?
No. The form submission must come from the location URL specified in your form configuration. If you need to add forms to multiple pages on your website, you will need to configure a new Form channel for each page.
Pricing
This feature is available on all plans.