
Overview
Articles are the documents that contain the written content in your knowledge base. This article will explain how to add and manage articles, and lists the various features included in the article editor.
You must have Front company admin, Knowledge Base admin, or Knowledge Base content editor permissions to manage articles.
Add or edit an article
Step 1
Click the Knowledge Base book icon in the top navigation bar.
Step 2
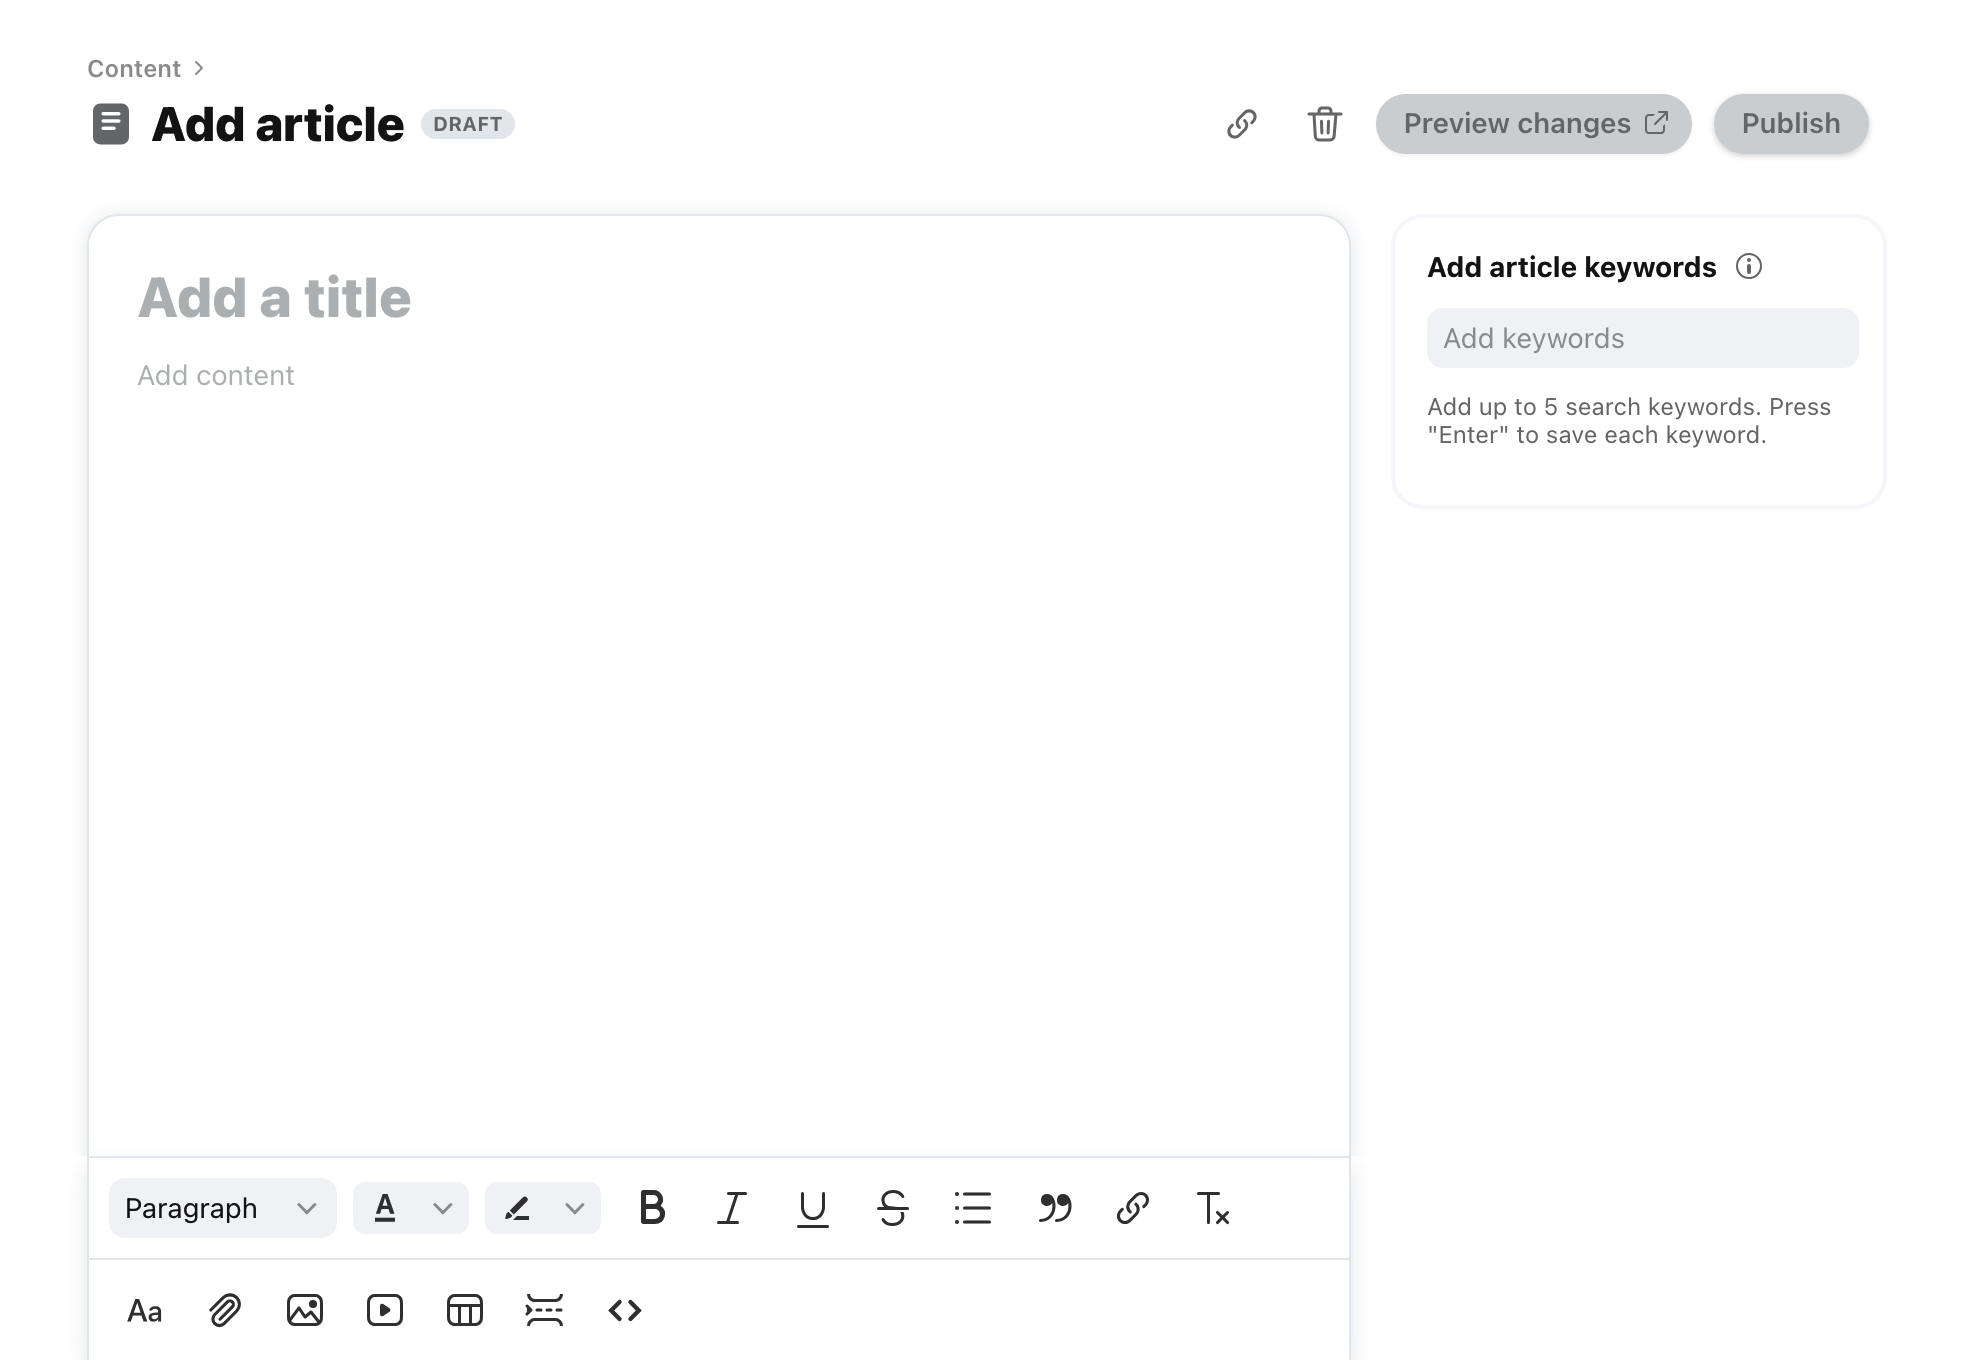
Click the Content tab, then click Add article.

Step 3
In the article editor, add a title and your article contents. Use the formatting toolbar to further customize your article. Any changes are automatically saved.
You can also add up to 5 article keywords to make your article rank higher in your knowledge base search results.
Step 4
Click Preview changes to review how your article will look in your knowledge base site.
Step 5
Click Publish once you’re ready to make the article visible in your knowledge base site. A green success message will appear at the bottom left once the article is published.
Formatting options
Front has a rich-text article editor with a suite of editing options to format your content.
Formatting toolbar
Click the Formatting options icon, the Aa icon, on the bottom left to hide or display the full formatting bar.

Paragraph
Choose from various header sizes to format and organize your written content. Text formatted with the header options will display in the article’s table of contents and will be used in anchor links.
Font color
Change the article font color in the dropdown of the Font color menu.
Text highlight
Highlight text using an array of highlight colors from in the Text highlight menu.
Font styling
Emphasize different parts of your text with the styling options: bold, italic, underline, and strikethrough.
Lists
Format your article with bulleted and numbered lists, or indentations by clicking the Lists icon.
Quote
Use the Quote icon to add a vertical line to the left of the text. Text and styling can be edited after using quote formatting.
Insert link
Hyperlink a word or phrase in your article by highlighting the text and clicking the Insert link icon. Alternatively, highlighting your text and pressing the paste shortcut, Cmd + V, will automatically add the hyperlink if you've previously copied the hyperlink.
Reset style
If you copy and paste a line of text into an article, and the formatting isn't what you're looking for, click the Reset style, or Tx icon, to revert back to the default style.
Attach files
Use the Attach files icon to attach up to 10 files from your computer. Users can download these files from your article.
Insert inline image
Click the Insert inline image icon to add an image or GIF to your article using a URL or inserting from your computer.
Currently these filetypes are accepted for images:
GIF (.gif)
JPEG (.jpeg, .jpg)
PNG (.png)
Insert a video link
Embed a YouTube, Vimeo, or Loom link in your article.
Table
Insert a table, or add and remove rows and columns.
Horizontal rule
Insert a horizontal line in your article.
Codeblock
Insert codeblock formatting to distinguish code content from the rest of your article.
Resize and align images
Select an image, then click and drag the square at the bottom-right to resize it. Hover over the image to select the alignment option (left, center, or right aligned).
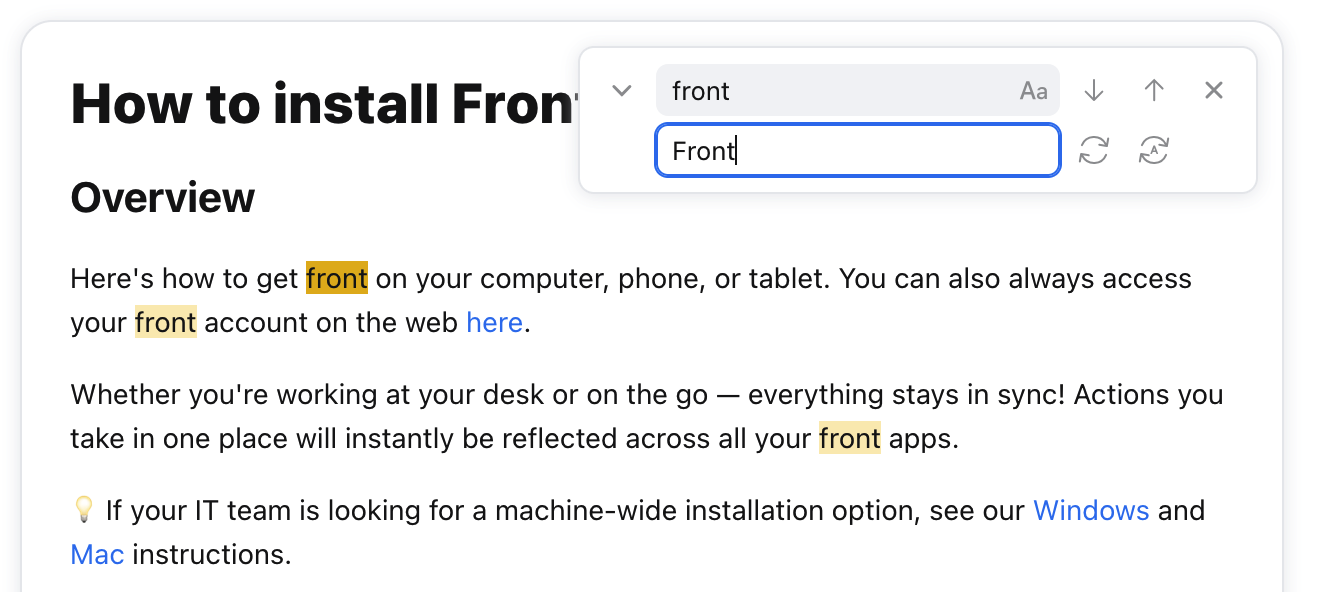
Find and replace text
Press CTRL/CMD+F on your keyboard to use the article search bar.
Use the Aa button to toggle case sensitivity
Use the arrow icons to toggle between matching keywords
Use the rotating arrow icons to replace the current matching keyword, or all matching keywords
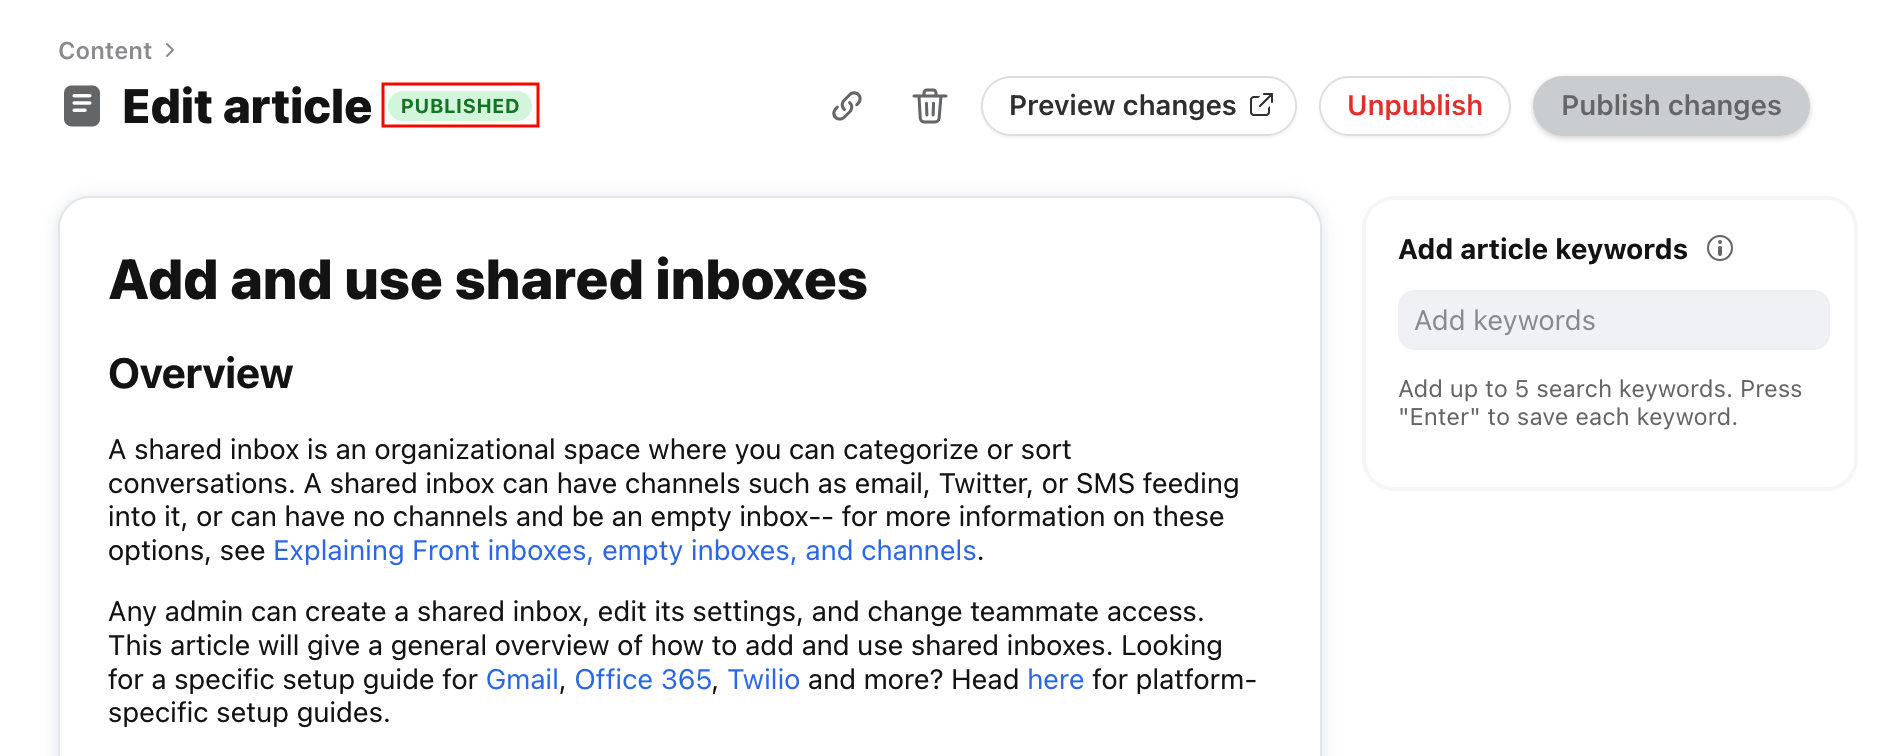
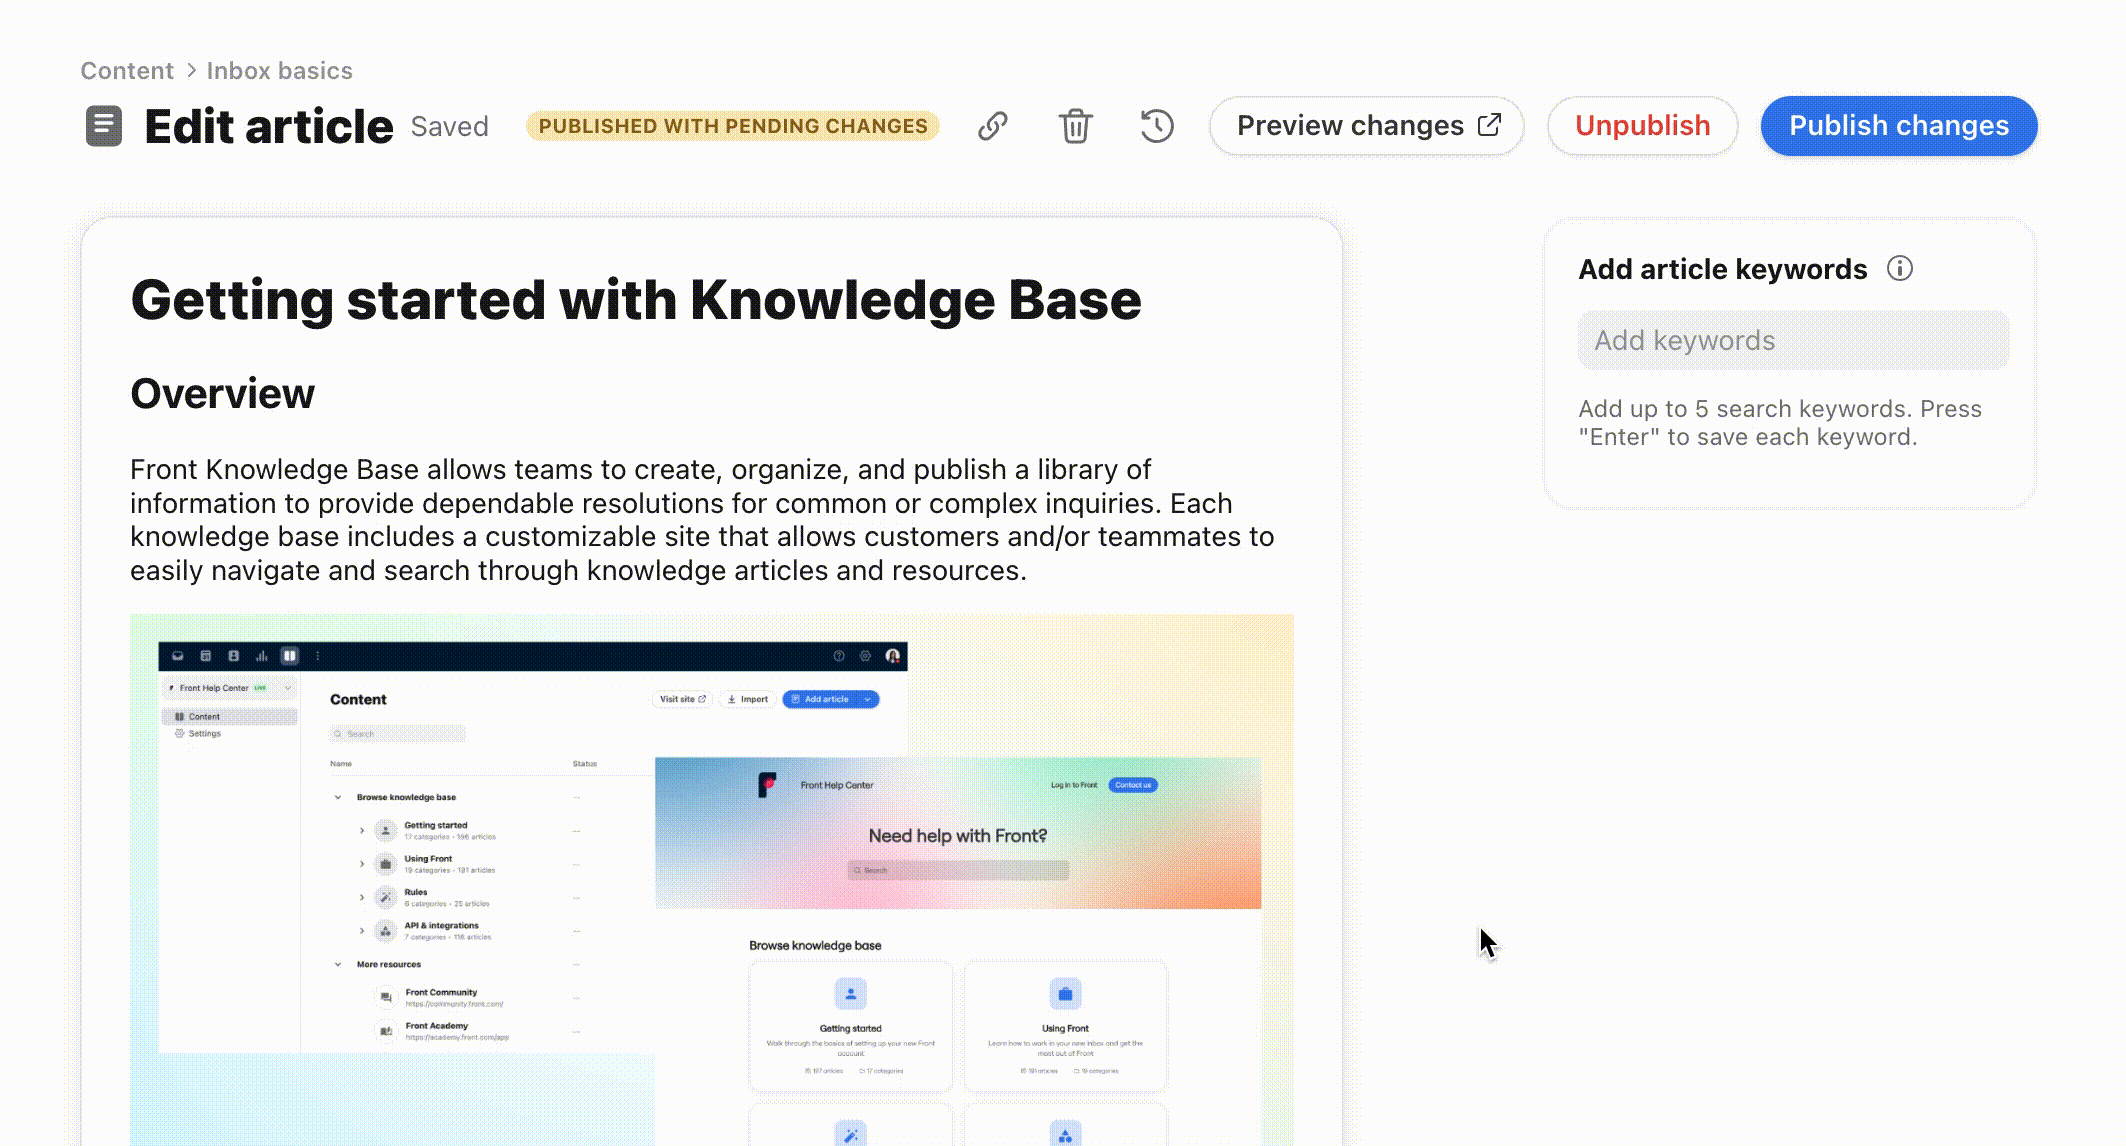
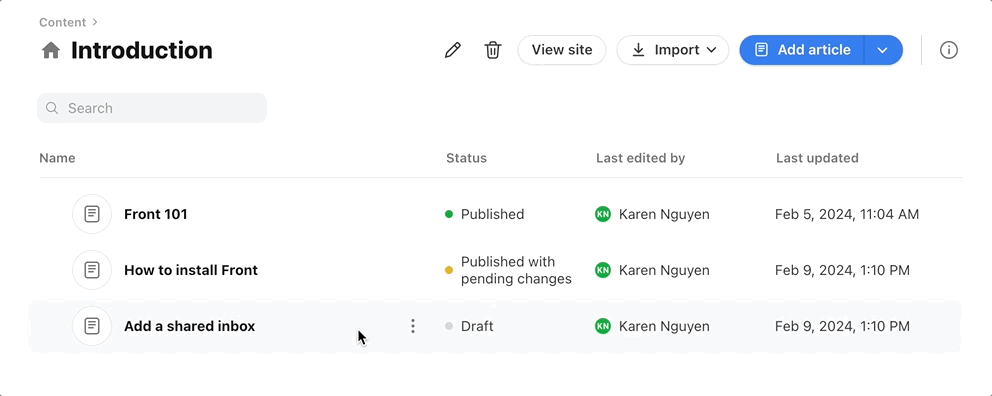
Article statuses
Each article is automatically assigned one of the following statuses:
Draft: The article is not published, and is only visible in the admin portal. It is not visible in your knowledge base site.
Published: The article is visible in your knowledge base site.
Published with pending changes: The article is currently published, but has a draft with unpublished changes. If you edit a published article, you’ll automatically create a draft that’s separate from the published version of the article. Edits in the draft will not become published until you choose to publish the draft.
Article version history
Click the View history icon to view an article’s revision history. For each version, you’ll see the timestamp, author, and article contents. Differences will be highlighted between versions.
Note: Article history is not available for article edits made prior to Sep 8, 2023.
[Coming soon] Restore old versions.
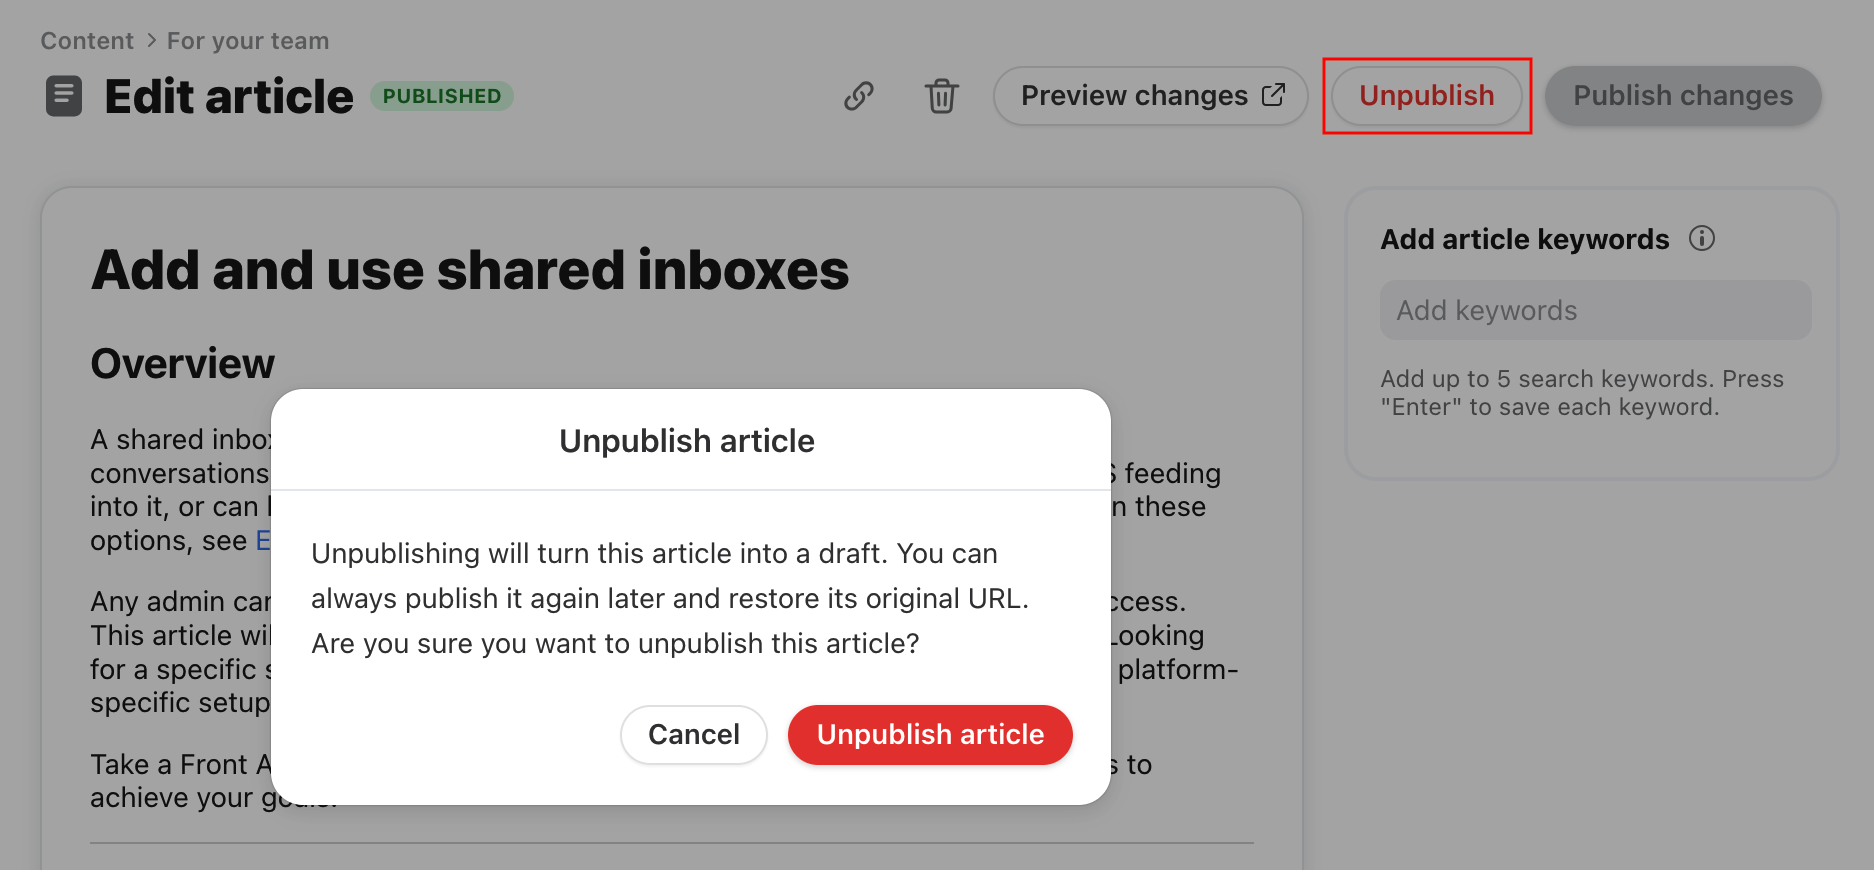
Unpublish or delete articles
Click Unpublish in an article to revert a published article back into a draft. This will remove the article from the website view, but it will still be accessible in the admin portal.
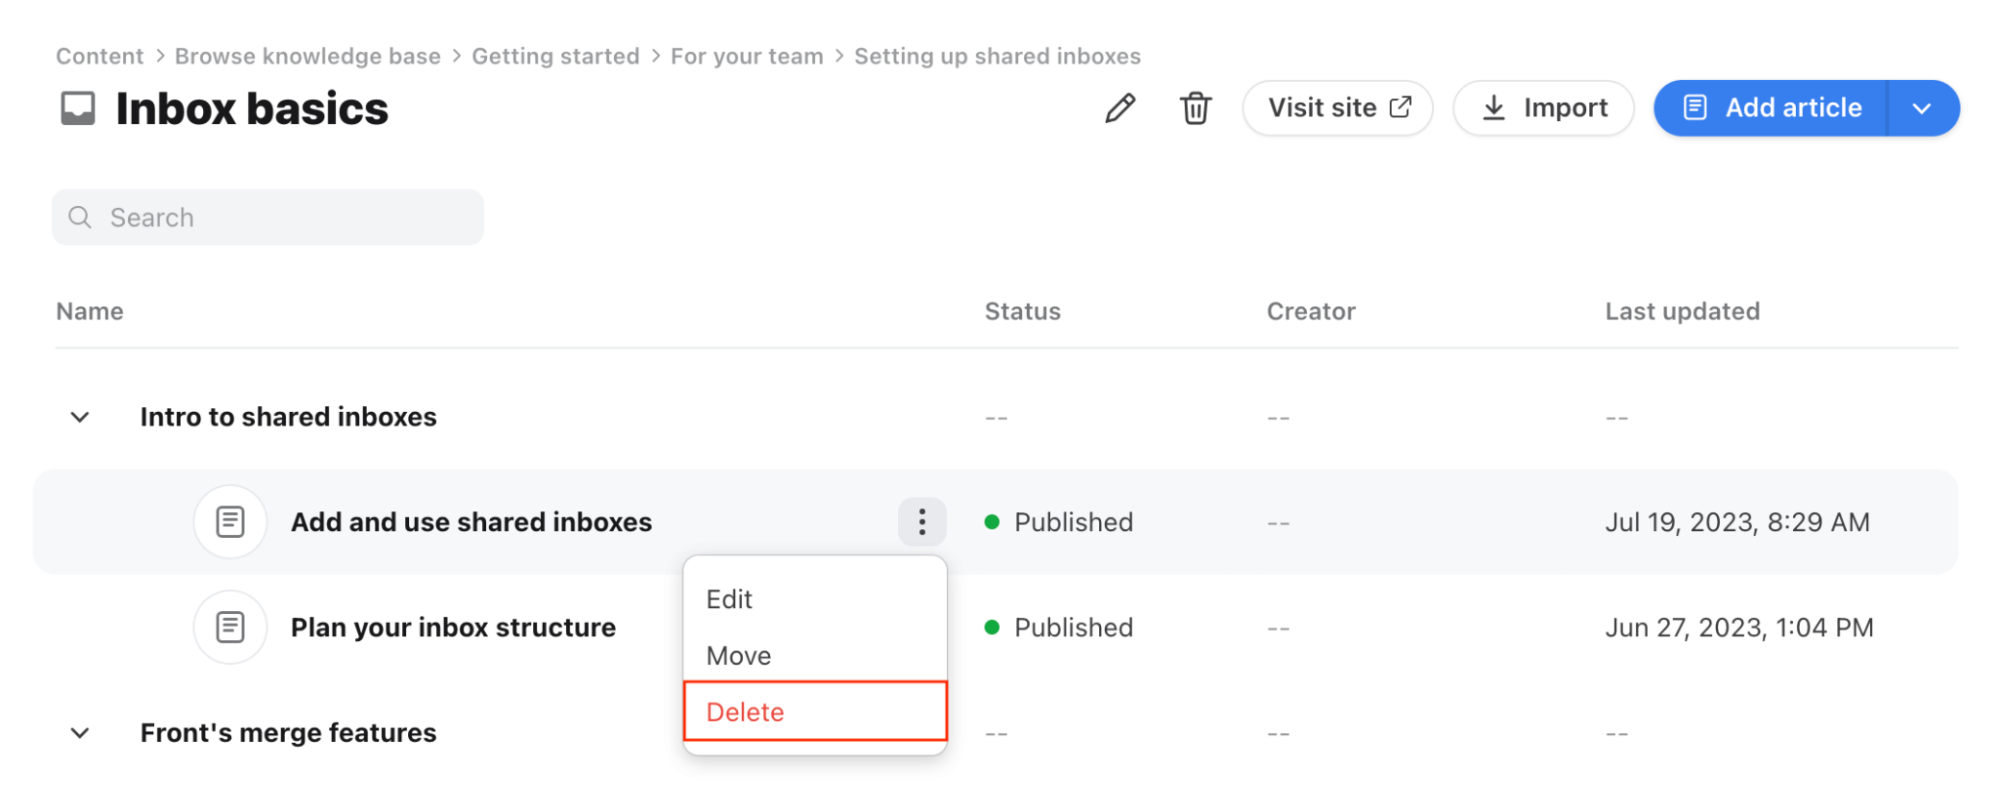
You can delete an article using the trash can icon inside the article, or via the three-dot menu in the article list. Once an article is deleted, it can no longer be recovered.
After deleting an article, you may want to set up a URL redirect to ensure users navigating to the outdated URL are redirected to a current resource.
Import articles
See the following articles for instructions on importing knowledge base articles into Front:
Import knowledge base articles from a URL: Use our importer to quickly import articles from your existing knowledge base into Front using your public URL.
Import knowledge base articles with a CSV: Follow this step-by-step guide to walk through importing knowledge base articles into Front using a CSV file.
Reorder articles
You can manually reorder your articles by dragging and dropping articles in the admin portal. This is useful for categories that have chronological steps, or for guiding visitors through basic to advanced features.
FAQ
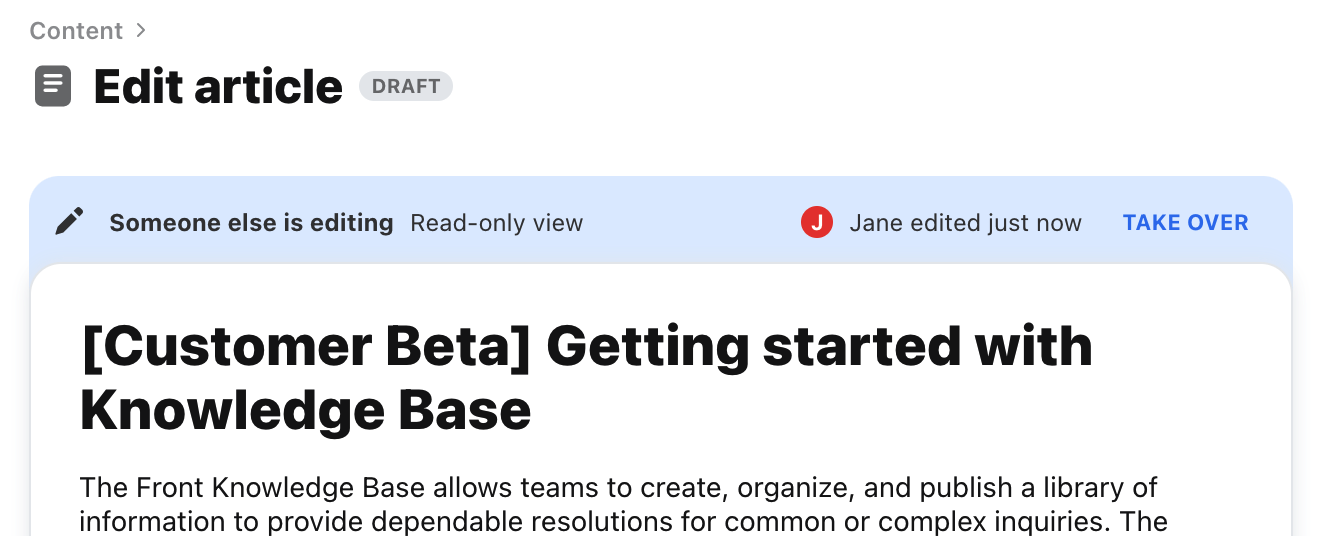
Can I see if a teammate is editing an article?
Yes. You’ll see a banner at the top of the article when a teammate is editing an article. Multiple teammates cannot edit an article at once, so click Take over if you need to edit the article.
Are article keywords visible to website visitors?
Yes. Website visitors can see keywords at the bottom of a published article.
Do article titles display in the URL?
No. Article URLs will only display with the article ID. Article titles (URL slugs) are not supported at this time.
Pricing
Front Knowledge Base is available on the following plans:
Latest Starter plan or above (May 2023)
Any Scale plan or above
If you are on a legacy plan and don't have access to this feature, you can update to one of our latest plans in your Billing settings or contact your account manager.